The Linear Burn Blend Mode
Linear Burn is much more useful blend mode than it first appears. When used at full strength it’s a bit much for most uses. A more dramatic cousin of Multiply (and part of the darkening blend-mode group) it often results in the clipping of the shadow areas of an image. Clipping also occurs with Color Burn. However Color Burn results in a much more color-saturated composite.
The Color Burn Blend Mode
Our previous post dealt with Multiply, one of the most useful and popular blend modes. This post covers Color Burn, a blend mode that's more obscure. However, this is partly because it's simply misunderstood and misused. Our goal here is to change that and make it much more powerful for you.
The Multiply Blend Mode
It must be said right from the start—the Multiply blend mode is one of the most useful in Photoshop's toolbox. In fact, It might be the most useful. Hardly a day goes by when I don't use Multiply for something. It's analogous to a screwdriver in my toolbox—I always want it around. I can't imagine doing my work without it.
The Darken Blend Mode
The past two blog posts on the Normal blend modes were a warmup. The description of this Normal group mostly serves as contrast to the rest of the modes. As we go down the list of available blend modes in the Layers Panel the first group below the Normal group that we find has five blend modes. The first on the list loosely describes what the rest of them do. And that first one is called Darken.
The Dissolve Blend Mode
I suppose that there’s a prevailing attitude among Photoshop users that there are a few go-to blend modes that are useful. The rest are thought of as curiosities, maybe a way to relieve tedium when image-editing fatigue sets in. Case in point: directly below Normal on the blend-mode list resides a mode called Dissolve. If one is driving down the road of blend-mode options, this is one exit that most people pass by. It seems like a route to nowhere.
Assign Profile…
Convert to Profile…
These are two of the most powerful commands in Photoshop—and among the least understood. They sound interchangeable. They sound compatible. Yet, even though they’re related, they are worlds apart in function. My students and clients often get into trouble with these evil twins. Let’s see if we can pull them apart and demystify their purpose.
Let’s establish this right from the start. It’s not your imagination—color management isn’t easy. It isn’t easy because your eyes and your brain and the colorful world around you are all complex. Trying to replicate the way we see and perceive is loaded with conditions and options. The world of color is certainly wonderful but it can present a bewildering mess to the uninitiated. Just try reproducing that certain shade of perfect blue in a photograph or on a lithographic printing press. But, rest assured. As much as color can be challenging, it is also ever rewarding. And the tools we have today to tame it are better than they ever have been before.
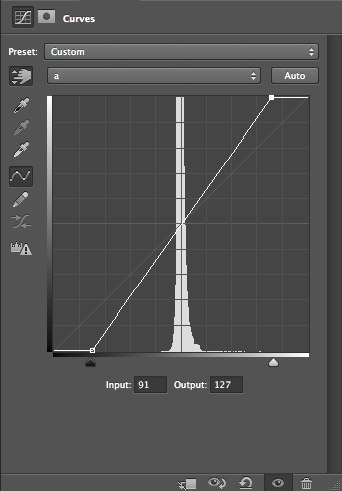
When working in the Lab color mode we can quickly and easily enhance color separation and saturation in myriad ways. As we’ve discussed in previous posts, the essential key is to increase the contrast of the *a* and/or *b* channels of the image. This can be done manually and individually (to each channel) with Curve or Levels adjustments or we might duplicate merge all layers onto a new, top layer and modify the blend mode of that layer. One of the most effective techniques of this type is the Multiply and Layer Mask Technique inspired by the great master of Lab, Dan Margulis. This not only enhances color but also deepens light areas of the image and will add some contour enhancement to the overall image as well.
Where we last left off on our Lab adventure we’d described a colorspace that could enhance and separate colors with both the *a* and *b* channels. These channels respond wildly to increased contrast, in ways that border on miraculous. Colors increase in saturation, separation, and definition. It is the most basic and fundamental move in the Lab-editing arsenal.